Having a blackhead pop up on your face is annoying enough, but what about those sneaky ones that appear in your ears? Yep, ear blackheads are a real thing, and ear blackhead removal can be just as stubborn as dealing with the ones on your nose or chin. They might be hidden, but they can cause discomfort and make you feel less confident.
As someone deeply committed to understanding and sharing practical skincare solutions, I've spent years researching and experimenting with safe, effective methods for various skin concerns. In this comprehensive guide, I'm going to walk you through everything you need to know about ear blackhead removal right from the comfort of your own home.

My goal is to empower you with the knowledge and techniques to tackle these blemishes safely, effectively, and with confidence, ensuring your ears look and feel their best. We'll explore why they appear, what tools are best, step-by-step removal methods, and crucial prevention strategies to keep your ears clear for the long haul. Let's dive in!
Key Takeaways
- Understand Ear Blackheads: Ear blackheads are clogged pores, often caused by excess oil, dead skin cells, and dirt. They appear black due to oxidation, not dirt.
- Prioritize Safety & Hygiene: Always ensure your hands and tools are clean, and soften the skin with a warm compress before attempting any removal to prevent irritation or infection.
- Gentle Removal Methods: Opt for methods like warm compresses, gentle exfoliation, or a sterile comedone extractor used correctly. Avoid squeezing with fingernails, which can cause damage.
- Prevention is Key: Regular, gentle cleansing, exfoliation, and a mindful lifestyle are crucial for preventing ear blackheads from forming in the first place.
- Know When to Seek Professional Help: If blackheads are deep, painful, or show signs of infection, or if you're unsure about at-home removal, consult a dermatologist.
What Are Ear Blackheads and Why Do They Appear?
Before we jump into removal, let's understand our adversary. What exactly is a blackhead, and why does it choose our ears as a prime location?
A blackhead, scientifically known as an open comedone, is essentially a hair follicle (pore) that has become clogged with sebum (your skin's natural oil), dead skin cells, and sometimes tiny bits of dirt or debris. When this clog is exposed to the air, the melanin (pigment) in the dead skin cells, along with the sebum, oxidizes and turns a dark, almost black color. This is why they're called “blackheads” – it's not actually dirt, but rather a chemical reaction!
Common Causes of Ear Blackheads
Our ears, despite often being out of sight, are just as susceptible to blackheads as our faces. Here are some of the primary reasons they might appear:
- Excess Sebum Production: Just like the rest of your skin, the skin on your ears has sebaceous glands that produce oil. Hormonal fluctuations, genetics, or even certain medications can lead to an overproduction of sebum, increasing the likelihood of clogged pores.
- Poor Hygiene: While we meticulously wash our faces, our ears sometimes get neglected. Infrequent or inadequate cleaning allows dead skin cells, sweat, and environmental pollutants to accumulate, paving the way for blackheads.
- Product Buildup: Hair products (shampoo, conditioner, styling gels, hairspray), earbud residue, or even certain skincare products can transfer to the ears and clog pores. I've personally seen how a favorite hair mousse can contribute to this issue if not rinsed properly!
- Wearing Headphones/Earbuds: Constant pressure and friction from headphones or earbuds can trap sweat and oil against the skin, creating a warm, moist environment ripe for pore blockages. They can also transfer bacteria and debris.
- Hormonal Changes: Adolescence, pregnancy, and other periods of hormonal shifts can trigger increased oil production, making blackheads more common.
- Genetics: Unfortunately, some of us are simply predisposed to oilier skin and larger pores, making us more prone to blackheads.
- Diet and Lifestyle: While direct links are still being researched, some studies suggest that a diet high in refined sugars and dairy might exacerbate skin issues. Focusing on a healthy, balanced diet, similar to what's recommended for maintaining healthy glucose levels or managing high blood pressure, can contribute to overall skin health.
- Sun Exposure: While not a direct cause, excessive sun exposure without proper skin cancer prevention can damage skin cells, leading to thicker skin and potentially more clogged pores.
“Blackheads are not a sign of poor hygiene, but rather a common skin condition resulting from clogged pores. Proper understanding is the first step to effective treatment.”
Why Ear Blackheads Are a Unique Challenge
You might think, “A blackhead is a blackhead, right?” Not entirely! Ear blackheads present their own set of unique challenges due to the anatomy of the ear and its common functions.
The Intricate Anatomy of the Ear
The outer ear (pinna or auricle) is a complex structure of cartilage and skin with numerous folds, curves, and crevices. These intricate shapes, while designed for sound collection, also create perfect hiding spots for blackheads.
- Concha: The large, deep hollow next to the ear canal.
- Helix and Antihelix: The prominent ridges and curves.
- Tragus and Antitragus: The small, pointed cartilage in front of and opposite the ear canal.
- Lobe: The fleshy, lower part of the ear.
Each of these areas can harbor blackheads. The folds make them difficult to see clearly without proper lighting and a mirror, and even harder to reach with your fingers. The skin in these areas can also be quite delicate, making aggressive removal attempts risky.
Visibility and Accessibility Issues
- Out of Sight, Out of Mind: Unlike facial blackheads that stare back at us in the mirror, ear blackheads are often only discovered by chance or when they become irritated. This lack of visibility means they can grow larger or more numerous before being noticed.
- Awkward Angles: Trying to remove a blackhead from your own ear requires contorting your body and using multiple mirrors, which can be frustrating and lead to improper technique.
- Delicate Skin: The skin on and around the ear canal is thinner and more sensitive than skin on other parts of the body. This means it's more prone to irritation, tearing, or infection if not treated with extreme care.
Because of these factors, a thoughtful and cautious approach is absolutely essential for safe and effective ear blackhead removal.
Preparation is Key: Setting the Stage for Safe Removal
Successful and safe at-home ear blackhead removal hinges almost entirely on proper preparation. Rushing into it without the right tools and steps can lead to irritation, infection, or even scarring. Trust me, I've learned this the hard way with other skin concerns – preparation is paramount!
Gathering Your Tools
Having the right equipment makes all the difference. Think of it like a surgeon preparing for an operation – precision and sterility are crucial.
Here's what I recommend having on hand:
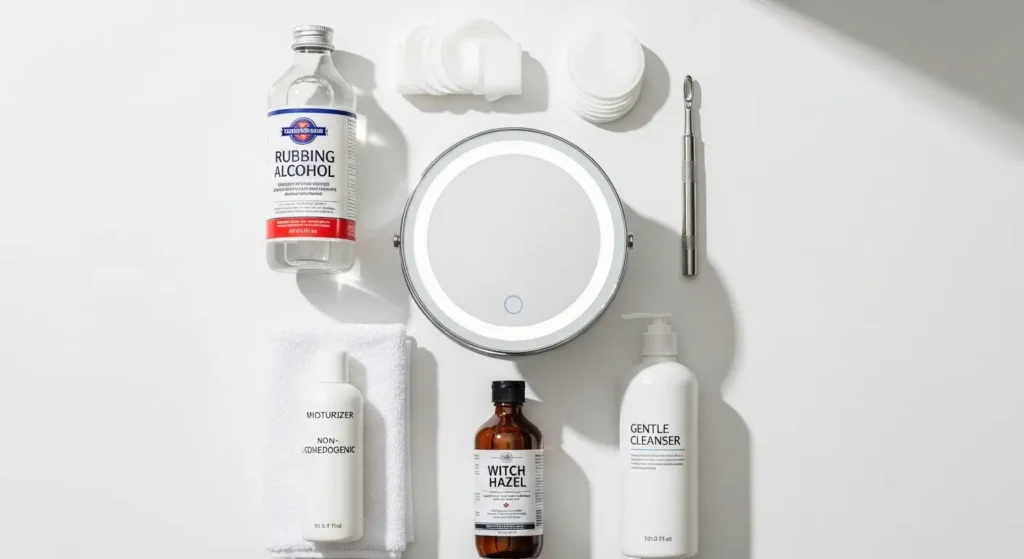
- Magnifying Mirror: A good quality magnifying mirror (preferably lighted) is non-negotiable. It allows you to clearly see the blackheads and the surrounding skin, minimizing guesswork.
- Good Lighting: Natural daylight is ideal, but if that's not available, a bright, focused lamp (like a desk lamp) is essential.
- Comedone Extractor Tool: This is a small, usually stainless steel tool with loops on either end. It's designed to apply even pressure around a blackhead, pushing out the clog without damaging the skin. Look for a medical-grade, sterile one.
- Why not fingers? Squeezing with fingernails can introduce bacteria, cause uneven pressure, damage surrounding tissue, and push the blackhead deeper, leading to inflammation or scarring.
- Rubbing Alcohol (Isopropyl Alcohol): For sterilizing your tools.
- Warm Compress (or Steamer): A clean washcloth soaked in warm water.
- Gentle Cleanser: A mild, pH-balanced cleanser for your ears.
- Antiseptic Solution or Witch Hazel: For post-removal cleansing.
- Moisturizer (Non-comedogenic): To soothe and protect the skin afterward.
- Cotton Pads or Swabs: For applying solutions.
- Gloves (Optional but Recommended): To further minimize bacterial transfer.
Hygiene First!
This step cannot be stressed enough. Your ears are close to your brain and inner ear structures, making infection a serious concern.
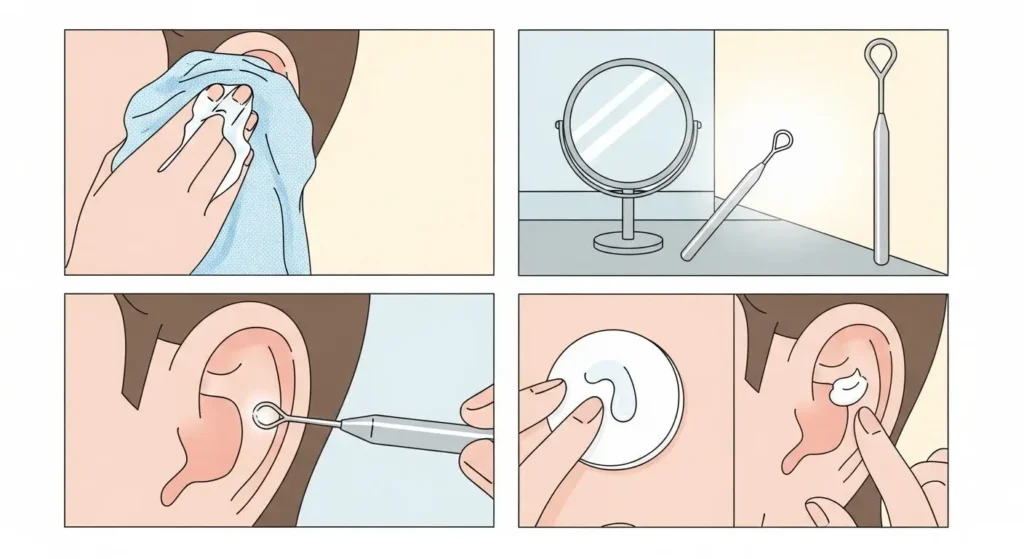
- Wash Your Hands Thoroughly: Use soap and warm water for at least 20 seconds.
- Clean Your Ears: Gently cleanse the outer ear with a mild, pH-balanced cleanser and warm water. Pat dry with a clean towel. This removes surface dirt, oil, and bacteria.
- Sterilize Your Tools: Before and after each use, wipe your comedone extractor with rubbing alcohol. You can also boil it for 10 minutes for extra sterilization, though alcohol is usually sufficient for at-home use.
Softening the Skin: The Essential Step
Attempting to extract a blackhead from dry, taut skin is like trying to pull a stubborn cork from a bottle – it's difficult and can cause damage. Softening the skin is crucial.
- Warm Compress Method: Soak a clean washcloth in warm (not scalding hot) water. Wring out excess water and apply it to the affected ear area for 5-10 minutes. The warmth helps to open up the pores and soften the hardened sebum, making extraction much easier and less traumatic for the skin.
- Steam Shower: Taking a warm shower can also work wonders. The steam helps to open pores all over your body, including your ears. Just ensure your ears are thoroughly clean beforehand.
“Patience and preparation are your best allies in the quest for clear, healthy ears. Never skip the warm compress!”
Step-by-Step Guide to Safe Ear Blackhead Removal
Once you've prepared, it's time for the main event. Remember, gentleness and precision are key. If you feel pain or resistance, stop immediately.
1. Lighting and Magnification
- Position Yourself: Stand in front of your magnifying mirror in a well-lit room. If using a handheld mirror for your ear, ensure you have a good angle and can see clearly. Some people find it easier to have a trusted friend or family member help, but ensure they also follow all hygiene protocols.
- Examine the Area: Use the magnifying mirror to pinpoint the blackheads you intend to remove. Take note of their size, depth, and surrounding skin condition. Never attempt to remove anything inside the ear canal itself.
2. The Gentle Approach: Extraction Methods
This is where the comedone extractor shines. Resist the urge to use your fingernails!
- Using a Comedone Extractor:
- Choose the Right Loop: Most extractors have two loops – a smaller one for tiny blackheads and a larger one for bigger ones. Select the loop that best fits around the blackhead.
- Position the Loop: Gently place the loop around the blackhead, ensuring the blackhead is in the very center of the loop.
- Apply Gentle, Even Pressure: Press down slowly and firmly on the skin surrounding the blackhead. You should be applying pressure downwards, then slightly wiggling or rocking the tool gently to encourage the blackhead to come out.
- Observe: The blackhead should emerge from the pore. If it doesn't come out with gentle pressure after a few attempts, do not force it. Forcing can damage the skin, push the blackhead deeper, or lead to bruising and scarring. Move on to another blackhead or consider it too stubborn for at-home removal.
- Clean the Tool: After each extraction, wipe the loop with rubbing alcohol to prevent spreading bacteria.
- Warm Compress (Revisit for Stubborn Ones): For very stubborn blackheads, reapply a warm compress for a few minutes to further soften the area before trying again.
- Gentle Exfoliation (Preventative/Maintenance): For very small, superficial blackheads, or as a preventative measure, a chemical exfoliant containing salicylic acid (BHA) can be effective. Apply a small amount with a cotton swab to the affected area. BHAs are oil-soluble, meaning they can penetrate oily pores and help dissolve the clog. This is more of a long-term strategy rather than an immediate removal method.
3. Post-Removal Care: Soothe and Protect
Once you've successfully removed the blackhead (or decided to leave a stubborn one alone), post-removal care is vital to prevent infection and promote healing.
- Cleanse Again: Gently wipe the treated area with a cotton pad soaked in an antiseptic solution (like witch hazel or a diluted tea tree oil solution) to disinfect the open pore.
- Soothe and Moisturize: Apply a small amount of a non-comedogenic, soothing moisturizer. Look for ingredients like aloe vera or hyaluronic acid. This helps to hydrate the skin and reduce any redness or irritation.
- Avoid Touching: Resist the urge to touch the area repeatedly, as this can introduce new bacteria.
- Give it Time: The skin might be slightly red or inflamed for a few hours. This is normal. If redness or pain persists or worsens, or if you notice swelling or pus, it's time to consult a doctor.
“Gentle does it. Your skin is delicate, especially around the ears. Always prioritize safety over immediate results.”
Tools of the Trade: What You'll Need
Let's break down the essential tools in more detail, as choosing the right ones can significantly impact your success and safety.
1. Comedone Extractor Tool
- Description: Typically made of surgical-grade stainless steel, these tools feature a small loop or spoon-like end designed to encircle a blackhead. Some have a pointed lancet on one end, but I strongly advise against using lancets at home unless you are a trained professional.
- Why it's essential: It allows for precise, even pressure around the blackhead, minimizing damage to surrounding skin. Unlike fingers, it won't introduce bacteria from under your nails.
- Pros: Effective when used correctly, hygienic (if sterilized), precise.
- Cons: Requires practice, can cause damage if used improperly or too forcefully.
- Recommendation: Invest in a high-quality, sterile, medical-grade extractor.
2. Magnifying Mirror (with Light)
- Description: A mirror with 5x, 10x, or even 15x magnification, often with built-in LED lighting.
- Why it's essential: Ear blackheads are often tiny and in hard-to-see areas. Magnification allows you to clearly identify them and guide your tool precisely. The light illuminates the area, reducing shadows.
- Pros: Improves visibility dramatically, crucial for precision.
- Cons: Can sometimes make you overly focused on tiny imperfections.
- Recommendation: A freestanding mirror is often easier to position than a handheld one.
3. Gentle Cleanser
- Description: A mild, pH-balanced facial cleanser, preferably non-foaming and free of harsh sulfates or fragrances.
- Why it's essential: To clean the ear area before and after removal, removing surface oil, dirt, and bacteria without stripping the skin.
- Pros: Prevents infection, prepares skin for treatment.
- Cons: Using harsh cleansers can irritate the skin.
- Recommendation: Look for cleansers with ingredients like ceramides or hyaluronic acid that support the skin barrier.
4. Rubbing Alcohol (70% Isopropyl Alcohol)
- Description: A common antiseptic solution.
- Why it's essential: For sterilizing your comedone extractor before and after each use. This is crucial to prevent introducing bacteria into open pores.
- Pros: Effective disinfectant.
- Cons: Can be drying to the skin if used directly (only for tools!).
- Recommendation: Keep a small bottle specifically for tool sterilization.
5. Warm Compress
- Description: A clean washcloth soaked in warm water.
- Why it's essential: Softens the skin and opens pores, making blackhead extraction easier and less painful.
- Pros: Natural, effective, soothing.
- Cons: Needs to be kept warm, requires a clean cloth each time.
- Recommendation: Use a separate, clean washcloth dedicated to this purpose.
6. Antiseptic Toner or Witch Hazel
- Description: A mild antiseptic solution or natural astringent.
- Why it's essential: To disinfect the skin after extraction, reducing the risk of bacterial infection. Witch hazel is also known for its soothing properties.
- Pros: Cleanses, soothes, prevents infection.
- Cons: Some toners can be drying if they contain too much alcohol.
- Recommendation: Choose an alcohol-free toner or pure witch hazel.
7. Non-Comedogenic Moisturizer
- Description: A lightweight moisturizer specifically formulated not to clog pores.
- Why it's essential: To hydrate and soothe the skin after extraction, promoting healing and preventing dryness or irritation.
- Pros: Supports skin barrier, reduces redness.
- Cons: Using a heavy or comedogenic moisturizer can lead to new blackheads.
- Recommendation: Look for labels like “non-comedogenic,” “oil-free,” or “for sensitive skin.”
By having these tools ready and understanding their purpose, you'll be well-equipped to handle ear blackhead removal safely and effectively.
When to See a Professional: Red Flags and Complications
While at-home ear blackhead removal can be effective for many, it's crucial to recognize its limits. There are times when a professional dermatologist or aesthetician should be your first point of contact. Ignoring these signs can lead to more serious skin issues.
When to Call in the Experts
- Deep or Painful Blackheads: If a blackhead is particularly large, deep-seated, or causes pain even before you touch it, attempting to remove it yourself can lead to significant trauma, bruising, or scarring. These often require specialized tools and techniques.
- Signs of Infection: If you notice any of the following, stop all at-home attempts and seek medical advice:
- Increased Redness and Swelling: Beyond minor post-extraction irritation.
- Pus or Discharge: A clear sign of bacterial infection.
- Warmth to the Touch: The area feels hot.
- Persistent Pain: Pain that doesn't subside or worsens.
- Fever: A systemic sign of infection.
- Cysts or Nodules: Sometimes, what looks like a blackhead is actually a deeper, inflamed lesion like a cyst or nodule. These are not blackheads and should never be squeezed or picked at home, as this can cause severe inflammation, infection, and permanent scarring.
- Uncertainty or Anxiety: If you're unsure about the nature of the blemish, or if you feel anxious about attempting removal yourself, it's always better to consult a professional. Their expertise can save you a lot of trouble.
- Recurring or Widespread Blackheads: If you're constantly battling ear blackheads despite consistent at-home care, a dermatologist can help identify underlying causes and recommend prescription-strength treatments or in-office procedures.
- Prior History of Scarring: If your skin is prone to scarring from even minor blemishes, it's best to let a professional handle extractions to minimize risks.
“Your health is paramount. If in doubt, always consult a dermatologist. They are trained to handle skin concerns safely and effectively.”
Potential Complications of Improper At-Home Removal
Attempting to force out a blackhead or using unsterilized tools can lead to several undesirable outcomes:
- Infection: Introducing bacteria into an open pore is the most common and serious risk. This can lead to painful pustules, cellulitis, or even more severe infections requiring antibiotics.
- Scarring: Aggressive squeezing or improper use of tools can damage the skin's collagen and elastin fibers, resulting in permanent pitted or raised scars.
- Hyperpigmentation: Post-inflammatory hyperpigmentation (dark spots) can occur, especially on darker skin tones, and can take months to fade.
- Bruising and Swelling: Too much pressure can rupture capillaries and cause visible bruising and swelling, making the area look worse than before.
- Pushing the Clog Deeper: Instead of extracting the blackhead, you might inadvertently push the contents deeper into the follicle, leading to a more painful and inflamed lesion.
Remember, the goal is clearer, healthier skin, not quick fixes that cause more problems.
Preventing Ear Blackheads: Long-Term Strategies
The best offense is a good defense! While knowing how to remove ear blackheads is valuable, preventing them from forming in the first place is even better. I've found that consistency and a holistic approach yield the best results for overall skin health, much like maintaining normal blood sugar readings requires consistent effort.
1. Daily Cleansing Routine
- Extend Your Face Wash: Make it a habit to gently cleanse your outer ears whenever you wash your face. Use a mild, pH-balanced cleanser. Pay attention to all the nooks and crannies.
- After Shower Care: After showering, ensure your ears are thoroughly dried, especially in the folds, to prevent moisture buildup that can harbor bacteria.
- Post-Workout Cleanse: If you sweat a lot, especially if you wear headphones during exercise, a quick, gentle cleanse of your ears afterward can be beneficial.
2. Exfoliation and Moisturizing
- Gentle Exfoliation: Incorporate a gentle chemical exfoliant (like a salicylic acid or BHA toner) into your routine 2-3 times a week. BHAs are oil-soluble, meaning they can penetrate the pore lining to dissolve oil and dead skin cells, effectively preventing blackheads. Apply with a cotton swab specifically to the outer ear folds.
- Hydration is Key: Even oily skin needs moisture. Use a lightweight, non-comedogenic moisturizer on your ears after cleansing. Hydrated skin is healthier skin and less likely to overproduce oil.
3. Diet and Lifestyle Factors
What you put into your body and how you live can significantly impact your skin's health.
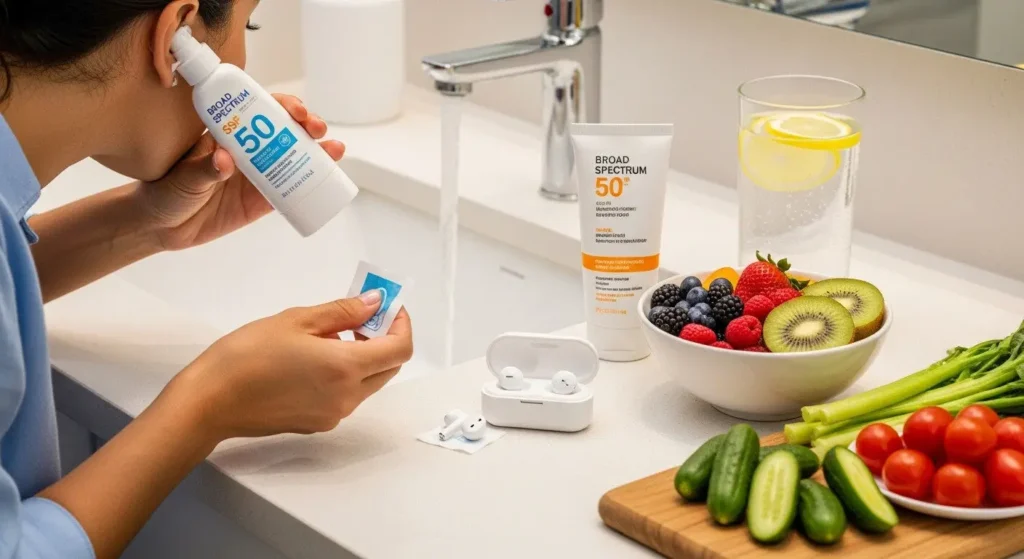
- Balanced Diet: Focus on a diet rich in fruits, vegetables, lean proteins, and whole grains. Limit processed foods, excessive sugar, and dairy, as some individuals find these can exacerbate skin conditions. A healthy diet contributes not just to clear skin but also to overall well-being, influencing everything from mens prostate health to managing high blood sugar symptoms.
- Stay Hydrated: Drinking plenty of water helps keep your skin supple and aids in detoxification.
- Manage Stress: Stress can trigger hormonal responses that increase oil production. Incorporate stress-reducing activities like yoga, meditation, or spending time in nature.
- Clean Your Headphones/Earbuds: Regularly wipe down your headphones and earbuds with an antiseptic wipe to remove bacteria and product residue that can transfer to your ears.
- Hair Product Awareness: Be mindful of where your hair products land. If you use heavy conditioners or styling products, try to keep them away from your ears, or rinse your ears thoroughly afterward.
- Sun Protection: Protect your ears from the sun! Sun damage can thicken the skin and impair its ability to shed dead cells properly, leading to more clogs. Use a broad-spectrum sunscreen on your ears, especially if you have short hair or wear your hair up. This is also a crucial aspect of overall skin cancer prevention.
4. Avoiding Common Mistakes
- Over-Cleansing: While hygiene is important, over-washing or using harsh cleansers can strip the skin of its natural oils, leading to compensatory overproduction of sebum and irritation.
- Picking and Squeezing: As discussed, this is a recipe for disaster. Let the tools do the work, or better yet, prevent them from forming.
- Ignoring Your Ears: Don't treat your ears as an afterthought in your skincare routine. They deserve the same attention as your face.
- Using Dirty Pillowcases: Change your pillowcases regularly to avoid transferring oil, dirt, and bacteria to your ears (and face) while you sleep.
By adopting these preventative strategies, you'll significantly reduce the likelihood of ear blackheads, making removal a rare necessity rather than a regular chore.
My Personal Experience and A Case Study
I remember a few years ago, shortly after a particularly stressful period in my life (which, incidentally, also coincided with some general health concerns that made me look into topics like nonbacterial prostatitis and overall wellness), I started noticing persistent blackheads in the folds of my ears. It wasn't just one or two; it felt like a whole colony had moved in!
Initially, I did what many people do: I tried to pick at them with my fingernails. Big mistake. Not only did they not budge, but I ended up with red, irritated patches that sometimes even developed into tiny, painful bumps. It was frustrating and made me feel self-conscious. I realized my haphazard approach was doing more harm than good.
That's when I decided to apply the same disciplined, research-backed approach I use for other health topics to my ear blackhead problem.
Case Study: My Journey to Clearer Ears
- The Problem: Persistent, small-to-medium sized blackheads in the concha and antihelix of both ears, leading to irritation and occasional mild pain.
- Initial Mistake: Unhygienic and aggressive squeezing with fingernails.
- The Plan:
- Dedicated Cleansing: I started extending my gentle facial cleanser to my ears every morning and night. I used a soft washcloth to ensure I reached all the crevices.
- Weekly BHA Exfoliation: Twice a week, I'd apply a small amount of a 2% salicylic acid toner to my outer ears using a cotton swab. This was a game-changer for prevention.
- Sterilized Comedone Extractor for Existing Ones: For the blackheads that were already there, I invested in a high-quality, sterile comedone extractor. I meticulously followed the preparation steps: warm compress for 5-7 minutes, sterilize the tool with alcohol, gentle pressure, and post-removal antiseptic.
- Hydration: I made sure to apply a lightweight, non-comedogenic moisturizer to my ears daily.
- Headphone Hygiene: I started wiping down my earbuds with an alcohol wipe after every use.
- Patience and Consistency: This was probably the hardest part, but I committed to the routine.
- The Results: Within a few weeks, I noticed a significant reduction in new blackheads. The existing ones, with careful, gentle extraction, slowly disappeared without scarring. My ears felt cleaner, looked clearer, and I no longer experienced that irritating itchiness. The occasional blackhead still pops up, but now I know exactly how to handle it safely and effectively.
This experience really reinforced for me that consistent, gentle, and informed care is truly the secret to managing skin concerns, whether it's blackheads or understanding how to remove tooth decay yourself (though that's a job for a dentist, illustrating the point of knowing when to DIY and when to go pro!).
The Science Behind Blackheads: A Deeper Dive
To truly understand ear blackhead removal and prevention, it helps to know the science behind why they form. It's not just about “dirty pores.”
1. Sebum and Sebaceous Glands
Your skin is covered in tiny openings called pores, which are essentially hair follicles. Attached to these follicles are sebaceous glands, responsible for producing sebum. Sebum is a waxy, oily substance that helps lubricate your skin and hair, keeping it supple and protected. It's a vital part of your skin's barrier function.
2. The Role of Keratin and Dead Skin Cells
Your skin is constantly renewing itself, shedding old, dead skin cells and replacing them with new ones. This process is called desquamation. Keratin is a protein found in these skin cells. Normally, dead skin cells are shed harmlessly from the skin's surface.
3. The Clog Formation
Blackheads occur when the hair follicle becomes blocked. This blockage usually happens due to:
- Excess Sebum Production: When sebaceous glands produce too much sebum, the oil can't flow freely out of the pore.
- Abnormal Shedding of Dead Skin Cells: Instead of shedding normally, dead skin cells (keratinocytes) can become “sticky” and accumulate within the follicle, mixing with the excess sebum.
- Bacterial Presence: While blackheads aren't primarily caused by bacteria, the presence of Propionibacterium acnes (P. acnes), a common skin bacterium, can contribute to inflammation in clogged pores, potentially turning a blackhead into an inflamed pimple.
This mixture of sebum and dead skin cells forms a plug, creating a small bump under the skin.
4. Oxidation: The “Black” in Blackhead
What makes a blackhead “black” and not just a white bump? It's all about exposure to air. Unlike whiteheads (closed comedones), which are covered by a thin layer of skin, blackheads are open to the air. When the trapped sebum and melanin (pigment from dead skin cells) at the surface of the pore come into contact with oxygen, they undergo a chemical reaction called oxidation. This oxidation process causes the plug to turn dark brown or black. It's similar to how an apple turns brown after you cut it and expose it to air.
So, the dark color isn't dirt, but a natural chemical process! Understanding this helps us focus on the real issue: the clog, and how to safely remove or prevent it.
Ear Anatomy 101: Understanding Your Canvas
To effectively and safely deal with ear blackheads, it’s incredibly helpful to have a basic understanding of your ear's outer anatomy. This knowledge helps you identify where blackheads commonly form and which areas require extra care.
The outer ear, or pinna (also called the auricle), is made of cartilage covered by skin, except for the earlobe, which is fleshy. It has many folds and curves, each with its own name.
Here are the key areas where you might find blackheads:
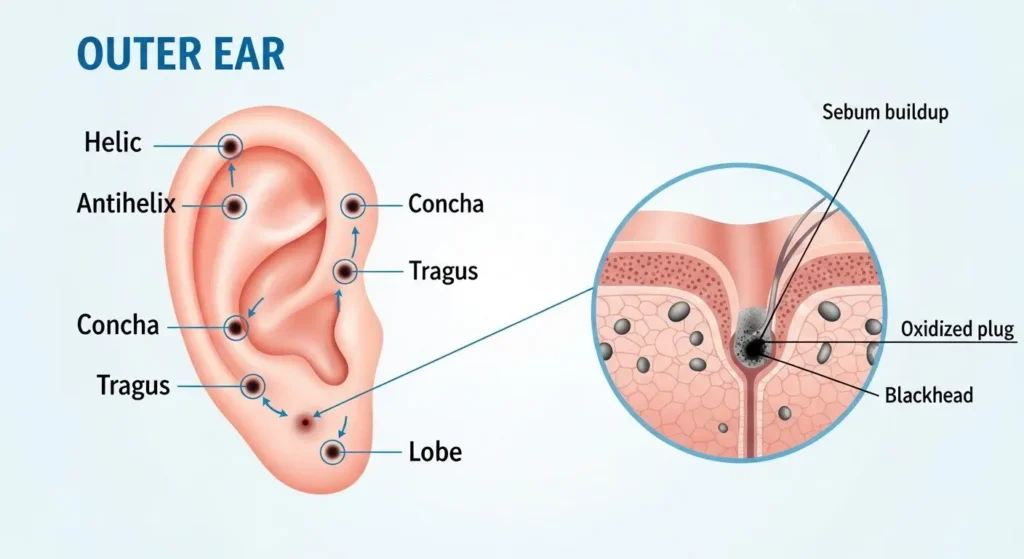
- Helix: This is the prominent, curved outer rim of the ear. Blackheads can often be found along this edge, especially if hair products or sweat accumulate here.
- Antihelix: This is the inner curved ridge, parallel to the helix. It has two “crura” (legs) that branch off, forming a fossa (depression). These folds are prime spots for sebum and dead skin cell buildup.
- Concha: This is the deep, bowl-like hollow that leads to the ear canal opening. It's a very common area for blackheads because it's a large, concave surface where oil and debris can easily collect.
- Tragus: This is the small, pointed piece of cartilage that projects backward over the ear canal opening. Its location makes it susceptible to blackheads, especially from earbud use.
- Antitragus: This is the small tubercle opposite the tragus, located above the earlobe.
- Lobe: The soft, fleshy lower part of the ear. Although often less prone to blackheads due to less cartilage and sometimes fewer sebaceous glands, they can still appear here.
Why is this important for blackhead removal?
- Targeted Cleaning: Knowing these areas helps you focus your cleaning and exfoliation efforts on the most susceptible spots.
- Safe Extraction: It reminds you to never attempt to extract anything inside the ear canal. Your focus should always be on the outer ear structures.
- Tool Navigation: Understanding the curves allows you to better maneuver your comedone extractor or cotton swab for effective, gentle application.
“Your ears are a marvel of natural engineering. Treat them with the respect and care they deserve to keep them healthy and clear.”
Maintaining Ear Health Beyond Blackheads
While blackheads are a common concern, overall ear health encompasses much more. Think of it like dental health; just preventing what causes tooth decay isn't the only goal, you also need to maintain gum health and regular check-ups. Here are some broader tips for keeping your ears in top condition:
- Avoid Cotton Swabs in the Ear Canal: This is a golden rule! Cotton swabs can push earwax deeper into the canal, leading to blockages, hearing problems, and even damage to the eardrum. Earwax is naturally expelled. Only clean the outer ear.
- Protect Against Loud Noise: Prolonged exposure to loud noises can cause permanent hearing damage. Use earplugs or noise-canceling headphones in noisy environments.
- Manage Earwax Buildup Safely: If you experience excessive earwax, consult a doctor. They can safely remove it or recommend over-the-counter drops. Never try to dig it out yourself.
- Keep Ears Dry: After swimming or showering, gently tilt your head to drain water and dry your outer ears. Trapped moisture can lead to ear infections.
- Monitor for Skin Changes: Just like the rest of your skin, your ears are susceptible to sun damage and skin cancer. Regularly check your ears for any unusual moles, spots, or sores, as part of your overall skin cancer prevention routine.
- Proper Piercing Care: If you have ear piercings, keep them clean and follow aftercare instructions diligently to prevent infection and irritation.
- Stay Hydrated and Healthy: As mentioned, overall health impacts skin health. A balanced diet and good hydration contribute to healthy skin and a healthy body. This ties into broader wellness goals, such as managing healthy glucose levels and maintaining general vitality.
By incorporating these practices, you're not just preventing blackheads; you're nurturing the long-term health and function of your ears.
The Importance of Patience and Consistency
I cannot emphasize this enough: skincare, especially when dealing with persistent issues like blackheads, is a marathon, not a sprint. Instant gratification is rarely the answer, and often leads to more problems.
- Rome Wasn't Built in a Day: You won't achieve perfectly clear ears overnight. It takes time for skin cells to renew, for pores to clear, and for your skin to respond to a new routine. Expect to see gradual improvements over weeks and months, not hours.
- Consistency is King: Sporadic efforts yield sporadic results. Sticking to your cleansing, exfoliating, and moisturizing routine every day (or as prescribed for exfoliants) is what truly makes a difference. Missing days or weeks can set you back.
- Gentleness Prevents Setbacks: Impatience often leads to aggressive picking, squeezing, or over-exfoliating. These actions damage the skin, cause inflammation, and can prolong the healing process, making your blackhead problem worse. Remember, a gentle approach is always the safest and most effective in the long run.
- Listen to Your Skin: Your skin will tell you what it likes and dislikes. If a product or method causes irritation, redness, or discomfort, scale back or stop using it. Patience allows you to observe these reactions and adjust your routine accordingly.
- Prevention Takes Time: Building a preventative routine means patiently waiting for your skin's natural processes to normalize. The regular use of BHAs, for instance, works by slowly dissolving clogs and preventing new ones, which is a gradual process that requires continuous application.
Think of it as cultivating a garden. You don't plant a seed and expect a full bloom the next day. You water it, nurture it, protect it from pests, and patiently wait for it to grow. Your skin is no different. Embrace the process, and you'll be rewarded with healthier, clearer ears.
Addressing Specific Scenarios
Sometimes, ear blackheads present unique challenges. Here's how to approach a couple of common scenarios:
Deep Blackheads
- Identify: These are often larger, more noticeable, and may feel slightly raised or firm under the skin. They're typically more stubborn.
- At-Home Approach: For deep blackheads, the warm compress step becomes even more crucial. Apply it for the full 10 minutes to ensure maximum softening. Use the larger loop of your comedone extractor, ensuring the blackhead is centered. Apply gentle, sustained pressure. If it doesn't budge after 2-3 gentle attempts, stop.
- When to See a Pro: If a deep blackhead causes pain, is very large, or simply won't come out with gentle pressure, it's best left to a dermatologist. They have stronger tools and techniques to extract these without damaging your skin. Forcing a deep blackhead can lead to significant scarring or infection.
Sensitive Skin
- Identify: Your skin might react easily to new products, show redness, or feel tight and dry after cleansing.
- At-Home Approach:
- Patch Test: Always patch test new products (cleansers, exfoliants, moisturizers) on a small, inconspicuous area of your ear for 24-48 hours before full application.
- Choose Ultra-Gentle Products: Opt for cleansers labeled “for sensitive skin,” “fragrance-free,” or “hypoallergenic.”
- Exfoliate Sparingly: If using a BHA, start with once a week and slowly increase to twice a week if your skin tolerates it. You might even prefer a gentler acid like PHA (polyhydroxy acid) or a very low concentration of AHA (alpha hydroxy acid).
- Moisturize Generously: Use a rich, soothing, non-comedogenic moisturizer to protect your skin barrier.
- Warm Compress, Not Hot: Ensure your warm compress is truly warm, not hot, to avoid irritating sensitive skin.
- When to See a Pro: If your sensitive skin reacts poorly to even gentle at-home methods, or if you're unsure about which products to use, a dermatologist can recommend a tailored regimen.
By understanding these nuances, you can adapt your ear blackhead removal strategy to your specific skin needs, ensuring safer and more effective results.
Environmental Factors and Ear Skin Health
Our environment plays a significant role in the health of our skin, and our ears are constantly exposed to these external elements. Understanding these factors can help us better protect our ears and prevent blackheads.
- Humidity and Temperature:
- High Humidity: Can lead to increased sweating and oil production, potentially contributing to clogged pores. In humid climates, more frequent, gentle cleansing might be beneficial.
- Low Humidity/Dry Air: Can cause skin to become dry and flaky. This might seem counterintuitive for blackheads, but dry skin can sometimes lead to an overproduction of sebum to compensate, or cause dead skin cells to accumulate more readily. Proper moisturizing becomes even more important here.
- Pollution: Air pollution contains fine particulate matter, dirt, and chemicals that can settle on the skin, including your ears. These pollutants can clog pores and contribute to oxidative stress, which can worsen blackheads and overall skin health. Regular cleansing is your first line of defense against environmental pollutants.
- Sun Exposure: I've mentioned this before, but it's worth reiterating. The sun's UV rays can damage skin cells, leading to thicker skin and impaired cell turnover, making pores more prone to clogging. Furthermore, sun exposure can cause premature aging and significantly increase your risk of skin cancer on the ears, which are often neglected areas for sunscreen application. Always apply a broad-spectrum sunscreen to your outer ears, especially if you spend time outdoors.
- Allergens: Contact with certain allergens (e.g., nickel in cheap earrings, fragrances in hair products) can cause irritation and inflammation, which might indirectly contribute to blackhead formation or make existing ones worse. If you notice persistent redness or itching, consider if a new product or material is the culprit.
By being mindful of these environmental factors and adjusting your skincare routine accordingly, you can provide better protection for your ear skin, fostering a clearer and healthier complexion.
Final Thoughts
Navigating the world of at-home skincare, especially for tricky areas like the ears, can feel overwhelming. But as we've explored throughout this comprehensive guide, with the right knowledge, tools, and a commitment to safety and hygiene, ear blackhead removal can be made easy and effective right from your home.
We've covered everything from understanding the scientific reasons behind blackhead formation and the unique challenges presented by ear anatomy, to the critical steps of preparation, gentle extraction techniques, and essential post-removal care. Most importantly, we've emphasized prevention through consistent cleansing, exfoliation, a healthy lifestyle, and being mindful of environmental factors. We also looked at when it’s absolutely necessary to seek professional help to avoid complications.
Remember these core principles:
- Hygiene is Non-Negotiable: Clean hands, clean tools, clean ears.
- Gentleness is Paramount: Never force a blackhead. If it resists, leave it alone.
- Preparation Pays Off: Always soften the skin with a warm compress first.
- Prevention is Your Best Strategy: A consistent daily routine will keep most blackheads at bay.
- Know Your Limits: When in doubt, consult a dermatologist.
Your ears deserve the same care and attention as the rest of your skin. By following these guidelines, you'll be well on your way to maintaining clear, healthy, and happy ears.